Easter is a time of renewal, celebration, and, of course, delicious treats. From chocolate eggs to hot cross buns, the holiday is filled with culinary delights that bring families and friends together. If you’re looking for a creative, portable, and downright adorable dessert to add to your Easter lineup, look no further than Easter cake pops. These bite-sized goodies combine the moist, flavorful crumb of cake with the irresistible sweetness of frosting, all wrapped up in a candy-coated shell and decorated to suit the season. Whether you’re hosting an Easter egg hunt, a spring brunch, or just want a fun activity to do with the kids, this Easter cake pops recipe is the perfect blend of tasty and festive.
In this article, we’ll walk you through everything you need to know to make your own Easter cake pops from scratch.
We’ll cover the ingredients, step-by-step instructions, decorating ideas, and pro tips to ensure your cake pops are a hit. Plus, we’ll explore how to customize them for Easter with pastel colors, bunny shapes, and more. Let’s hop right in!
Why Cake Pops Are Perfect for Easter
Cake pops have taken the dessert world by storm in recent years, and it’s easy to see why. They’re single-serving, mess-free, and endlessly customizable—qualities that make them ideal for Easter celebrations. Unlike a traditional cake that requires slicing and serving, cake pops are grab-and-go, making them a great choice for parties, picnics, or Easter baskets. Plus, their small size means you can indulge without overdoing it (though we won’t judge if you sneak a few extras!).
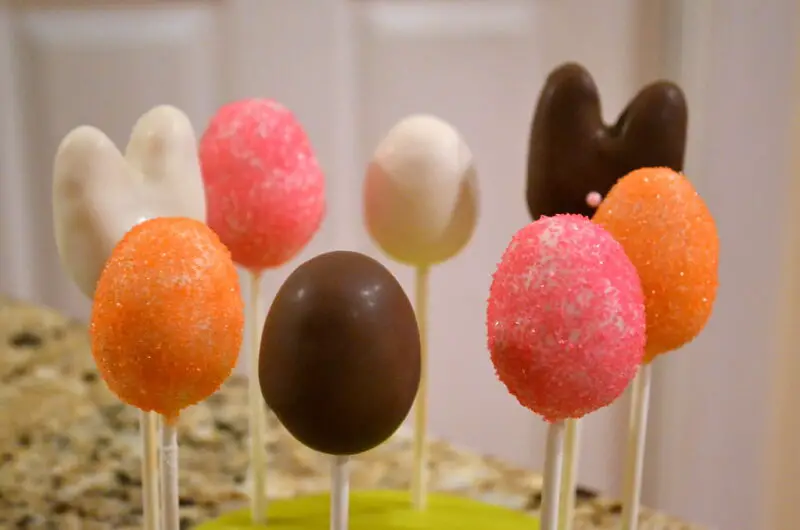
For Easter, cake pops offer a canvas for creativity. You can decorate them to look like Easter eggs, baby chicks, bunnies, or even flowers blooming in springtime. The combination of cake and candy coating also allows you to play with flavors and colors that evoke the pastel palette of the season. Whether you’re a baking novice or a seasoned pro, this recipe is approachable and fun, with results that are sure to impress.
Easter Cake Pops Recipe
Ingredients
For the Cake:
- 1 box of cake mix (vanilla, chocolate, or lemon—your choice!) or ingredients for your favorite homemade cake recipe (about 9×13-inch cake size)
- Ingredients listed on the cake mix box (typically eggs, oil, and water) or per your recipe
- Optional: 1 teaspoon of vanilla extract or almond extract for extra flavor
For the Frosting:
- 1/2 cup unsalted butter, softened
- 2 cups powdered sugar
- 1-2 tablespoons milk or heavy cream
- 1 teaspoon vanilla extract
- Pinch of salt
- Alternatively: 3/4 cup of store-bought frosting (match the flavor to your cake—vanilla, chocolate, or cream cheese work well)
For Assembly and Decoration:
- 12 ounces candy melts (white, pastel pink, yellow, or blue—choose Easter colors!)
- 1 tablespoon vegetable oil or shortening (optional, for smoother melting)
- Lollipop sticks (available at craft or baking stores)
- Sprinkles (pastel colors, Easter shapes like eggs or bunnies)
- Optional: Food coloring (gel works best for vibrant hues)
- Optional: Edible markers or small candies for details (e.g., eyes for bunny cake pops)
Equipment
- Mixing bowls
- Electric mixer (optional, for frosting)
- Baking pan (9×13-inch or similar)
- Cookie scoop or spoon
- Microwave-safe bowl or double boiler
- Styrofoam block or cake pop stand (to hold pops while drying)
- Parchment paper
Yield
- Approximately 24-30 cake pops, depending on size
Step-by-Step Instructions
Step 1: Bake the Cake
Start by preparing your cake. If you’re using a box mix, follow the instructions on the package—typically, this involves combining the mix with eggs, oil, and water, then baking in a 9×13-inch pan at 350°F (175°C) for 25-30 minutes. Add a teaspoon of vanilla or almond extract to the batter for a flavor boost if desired. If you’re making a cake from scratch, use your favorite recipe—just ensure it yields about the same amount as a box mix (a standard 9×13-inch cake).
Once baked, let the cake cool completely. This is key—warm cake will make the mixture too sticky later on. To speed things up, you can pop it in the fridge for 30 minutes after it’s cooled to room temperature.
Step 2: Crumble the Cake
Once cooled, transfer the cake to a large mixing bowl and crumble it into fine crumbs. You can use your hands, a fork, or even a food processor for this step. The goal is a uniform texture with no large chunks. This is a great part to get kids involved in—they’ll love smashing the cake!
Step 3: Make the Frosting (or Prep Store-Bought)
If you’re making homemade frosting, beat the softened butter with an electric mixer until creamy. Gradually add the powdered sugar, vanilla extract, and a pinch of salt, mixing until smooth. Add milk or cream, one tablespoon at a time, until you reach a spreadable consistency. If using store-bought frosting, measure out about 3/4 cup and set it aside.
Step 4: Mix Cake and Frosting
Add the frosting to the crumbled cake, starting with about half the amount. Mix with your hands or a spoon until the cake starts to stick together. You want a dough-like consistency that holds its shape when rolled into a ball—not too wet or sticky. Add more frosting as needed, but go slowly—too much will make the pops fall apart later. For a standard cake, 1/2 to 3/4 cup of frosting usually does the trick.
Step 5: Shape the Cake Pops
Using a cookie scoop or spoon, portion out the cake mixture and roll it into balls about 1-1.5 inches in diameter (think golf ball size). For Easter flair, you can also shape some into ovals for eggs or flatten one side for bunny faces. Place the balls on a parchment-lined baking sheet and chill in the fridge for 1-2 hours, or the freezer for 20-30 minutes, until firm.
Step 6: Prepare the Candy Coating
Melt the candy melts in a microwave-safe bowl in 30-second intervals, stirring between each, until smooth. If the mixture is too thick, stir in a teaspoon of vegetable oil or shortening to thin it out. For Easter vibes, divide the melted candy into separate bowls and tint with gel food coloring—think soft pink, lavender, or pale yellow.
Step 7: Assemble the Cake Pops
Remove the chilled cake balls from the fridge. Dip the tip of a lollipop stick into the melted candy coating (about 1/2 inch), then insert it halfway into a cake ball. This acts as “glue” to hold the ball in place. Repeat for all the balls, then let them sit for a minute to set.
Step 8: Dip and Decorate
Dip each cake pop into the melted candy coating, submerging it fully. Gently tap the stick against the bowl’s edge to remove excess coating—too much can weigh the pop down and cause it to slide off. While the coating is still wet, add sprinkles or other decorations. For bunny pops, attach small candies for ears or use an edible marker for faces after the coating dries. Place the finished pops upright in a Styrofoam block or cake pop stand to dry completely.
Step 9: Let Them Set
Allow the cake pops to set at room temperature for about an hour, or speed it up by placing them in the fridge for 20-30 minutes. Once the coating is hard, they’re ready to enjoy!
Easter Decorating Ideas
Here’s where the fun really begins! Easter cake pops are all about whimsy and charm. Try these ideas to make them extra festive:
- Easter Eggs: Use pastel-colored candy melts (pink, blue, yellow) and drizzle contrasting colors in zigzag patterns with a piping bag. Add tiny sprinkles for a speckled egg effect.
- Bunny Pops: Shape the cake into ovals, dip in white candy coating, and attach mini marshmallow ears or candy pieces. Draw faces with edible markers or melted chocolate.
- Chick Pops: Use yellow candy melts and add orange candy beaks and black sprinkle eyes for adorable baby chicks.
- Flower Pops: Dip in green coating for stems, then pipe flower petals with melted candy in pastel shades.
Tips for Perfect Cake Pops
- Don’t Overdo the Frosting: Too much frosting makes the mixture mushy and hard to shape. Start small and add more as needed.
- Chill Thoroughly: Cold cake balls hold their shape better when dipped.
- Thin the Coating: If the candy melts are too thick, a little oil or shortening makes dipping smoother.
- Work in Batches: Dip a few pops at a time to avoid the coating hardening before you decorate.
- Store Properly: Keep finished cake pops in an airtight container at room temperature for up to a week, or in the fridge for two weeks. They can also be frozen for up to a month.
Flavor Variations
While vanilla cake with vanilla frosting is a classic, you can mix it up for Easter:
- Lemon Bliss: Use lemon cake mix and add lemon zest to the frosting for a zesty spring flavor.
- Chocolate Delight: Pair chocolate cake with chocolate frosting and dip in pastel candy melts for contrast.
- Carrot Cake Twist: Make a carrot cake base with cream cheese frosting for an Easter nod to the Easter Bunny’s favorite snack.
Serving and Gifting Ideas
Easter cake pops are as versatile as they are delicious. Serve them at your Easter brunch displayed in a cute basket lined with faux grass, or stick them in a floral foam base for a centerpiece. They also make fantastic gifts—wrap them individually in cellophane bags tied with pastel ribbons and tuck them into Easter baskets alongside jelly beans and chocolate eggs.
Conclusion
This Easter cake pops recipe is more than just a dessert—it’s a celebration of creativity, flavor, and the joy of the season. With a little time and a lot of fun, you can whip up a batch of these delightful treats that will have everyone hopping with excitement. Whether you stick to simple pastel balls or go all out with bunny and egg designs, these cake pops are sure to become an Easter tradition in your home. So grab your ingredients, gather your loved ones, and let’s make some sweet memories this spring!
Happy Easter, and happy baking!


