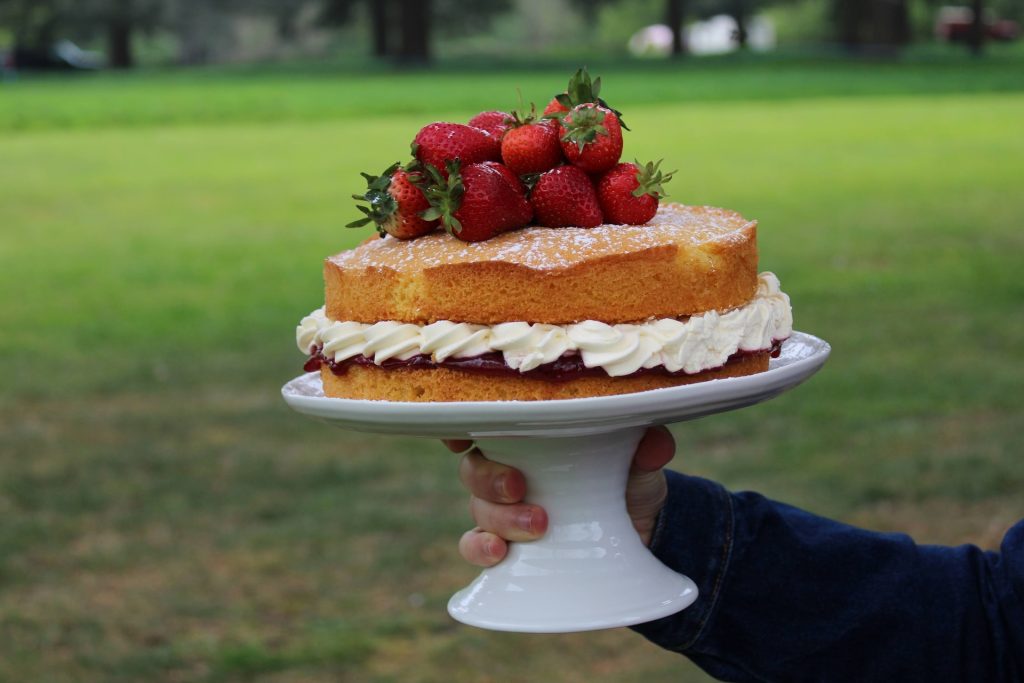
The Victoria Sponge Cake, also known simply as the Victoria Sandwich, is a classic British dessert that has been enjoyed for generations. Named after Queen Victoria, who was known to have a slice with her afternoon tea, this cake is a symbol of elegance and simplicity in the world of baking. A Victoria Sponge consists of two light and fluffy sponge layers sandwiched together with a layer of jam and a generous dollop of whipped cream. It’s a delightful treat that’s perfect for any occasion, from tea parties to birthdays. In this comprehensive guide, we’ll take you through the step-by-step process of making a perfect Victoria Sponge Cake.
Ingredients
Before we dive into the baking process, let’s gather the ingredients you’ll need to make your Victoria Sponge Cake. This recipe is for a basic 8-inch round cake.
For the Sponge:
225g (1 cup) unsalted butter, softened
225g (1 cup) caster sugar
4 large eggs, at room temperature
225g (1 ½ cups) self-raising flour
1 teaspoon baking powder
2 tablespoons whole milk
1 teaspoon pure vanilla extract
For the Filling:
150g (1/2 cup) raspberry or strawberry jam
300ml (1 ¼ cups) heavy whipping cream
A pinch of powdered sugar (optional)
Fresh strawberries or raspberries for decoration (optional)
Equipment:
Two 8-inch round cake tins
Parchment paper
Electric mixer or handheld whisk
Mixing bowls
Spatula
Wire cooling rack
Now that you have everything ready, let’s start baking your Victoria Sponge Cake.
Step 1: Preheat the Oven
Preheat your oven to 180°C (350°F) for a conventional oven or 160°C (320°F) for a fan-assisted oven. Ensure the oven rack is placed in the center position. While the oven is preheating, prepare your cake tins.
Step 2: Prepare the Cake Tins
Grease the bottom and sides of your two 8-inch round cake tins with butter. Then, line the bottoms of the tins with parchment paper to prevent the cakes from sticking. This will make it easier to remove the cakes from the tins later.
Step 3: Sift the Dry Ingredients
In a mixing bowl, sift together the self-raising flour and baking powder. Sifting helps aerate the dry ingredients and ensures a light and airy sponge.
Step 4: Cream the Butter and Sugar
In a separate large mixing bowl, cream together the softened butter and caster sugar until the mixture becomes pale and fluffy. You can use an electric mixer or a handheld whisk for this step. This process should take about 3-5 minutes.
Step 5: Add the Eggs
Add the eggs one at a time, beating well after each addition. Make sure each egg is fully incorporated before adding the next one. If the mixture starts to curdle, add a tablespoon of the sifted flour to help stabilize it.
Step 6: Incorporate the Dry Ingredients
Gently fold the sifted dry ingredients into the egg, butter, and sugar mixture using a spatula. Add the flour in two or three batches, folding until just combined. Be careful not to overmix, as this can make the cake tough.
Step 7: Add Milk and Vanilla
Pour in the whole milk and add the pure vanilla extract to the cake batter. Gently fold these ingredients into the mixture until well combined.
Step 8: Divide and Fill Cake Tins
Divide the cake batter evenly between the prepared cake tins. Use a spatula to smooth the tops and create an even layer.
Step 9: Bake the Cakes
Place the filled cake tins in the preheated oven and bake for approximately 25-30 minutes or until the cakes are golden brown and spring back when lightly pressed with a finger. You can also insert a toothpick into the center of each cake; it should come out clean when the cakes are done.
Step 10: Cool the Cakes
Remove the cakes from the oven and allow them to cool in the tins for about 10 minutes. Then, run a knife around the edges to loosen them and carefully turn the cakes out onto a wire cooling rack. Peel off the parchment paper and let the cakes cool completely.
Step 11: Prepare the Filling
While the cakes are cooling, prepare the filling. Whip the heavy cream until it forms soft peaks. If desired, you can add a pinch of powdered sugar while whipping to sweeten the cream.
Step 12: Assemble the Cake
Once the cakes are completely cooled, it’s time to assemble your Victoria Sponge Cake. Place one cake layer on a serving plate or cake stand.
Step 13: Spread the Jam
Spread a generous layer of raspberry or strawberry jam over the top of the first cake layer.
Step 14: Add the Whipped Cream
Next, spoon the whipped cream over the jam layer and spread it out evenly with a spatula.
Step 15: Top with the Second Cake Layer
Place the second cake layer on top of the cream and gently press down to secure it in place.
Step 16: Dust with Powdered Sugar (Optional)
If you like, you can dust the top of the cake with a light layer of powdered sugar for a decorative touch.
Step 17: Decorate with Fresh Berries (Optional)
For an extra flourish, decorate your Victoria Sponge Cake with fresh strawberries or raspberries on top of the whipped cream.
Step 18: Serve and Enjoy!
Your Victoria Sponge Cake is now ready to be served! Slice it into portions and enjoy this classic British treat with a cup of tea or coffee.
Tips for Success
Use room temperature ingredients: Ensure that your eggs and butter are at room temperature. This helps create a smoother batter and better incorporation of ingredients.
Don’t overmix: Be gentle when folding the dry ingredients into the wet mixture. Overmixing can result in a denser cake.
Even layers: When dividing the batter between the cake tins, use a kitchen scale to ensure both layers are of equal size. This helps with even baking.
Check for doneness: Oven temperatures can vary, so use the toothpick test to determine if the cakes are fully baked. If the toothpick comes out clean, they’re ready.
Customize your filling: While raspberry or strawberry jam and whipped cream are classic choices, feel free to get creative with different jams or fillings like lemon curd or chocolate ganache.
Making a Victoria Sponge Cake is a delightful and rewarding baking experience. This classic British treat combines a light and airy sponge with sweet jam and luscious whipped cream to create a cake that’s perfect for any occasion. By following this step-by-step guide and using the right ingredients and techniques, you can enjoy a homemade Victoria Sponge Cake that’s fit for a queen – or anyone else who appreciates a delicious dessert. So, roll up your sleeves, gather your ingredients, and get ready to bake a cake that will surely impress your friends and family.
Additional Tips and Variations
While the basic Victoria Sponge Cake recipe is a crowd-pleaser, there are several ways to personalize and enhance your cake-making experience. Here are some additional tips and variations to consider:
Flavor Variations: You can add different flavors to your Victoria Sponge Cake by incorporating extracts, zest, or spices. For example, try adding a teaspoon of lemon zest or almond extract for a unique twist.
Fruit Fillings: Instead of or in addition to jam, you can use fresh fruit as a filling. Sliced strawberries, raspberries, or even passion fruit can add a burst of freshness to your cake.
Layered Fruits: Consider placing a layer of sliced fruit on top of the jam before adding the whipped cream for a more vibrant and fruity filling.
Chocolate Victoria Sponge: For chocolate lovers, you can turn your classic sponge into a chocolate version by substituting some of the flour with cocoa powder. Add chocolate chips or chunks for an extra chocolatey kick.
Nutty Additions: Incorporate chopped nuts like almonds or walnuts into the cake batter for added texture and flavor.
Decorative Touches: Get creative with your cake’s appearance by garnishing it with edible flowers, mint leaves, or even a light drizzle of chocolate sauce.
Mini Victoria Sponges: Instead of one large cake, you can make mini Victoria Sponges by using smaller cake tins or a muffin pan. These are perfect for individual servings.
Gluten-Free Version: Adapt the recipe to be gluten-free by using a gluten-free self-raising flour blend.
Dietary Restrictions: If you or your guests have dietary restrictions, there are various substitutions available, such as using dairy-free margarine, plant-based milk, and egg substitutes for a vegan version.
Storage: Store any leftover Victoria Sponge Cake in an airtight container in the refrigerator. It’s best enjoyed within a day or two to maintain its freshness.
The Victoria Sponge Cake is a timeless classic that has stood the test of time due to its simplicity and delightful taste. Whether you’re baking it for a special occasion, afternoon tea, or just as a sweet treat for yourself, following this step-by-step guide will ensure your cake turns out perfectly.
Remember that practice makes perfect, and don’t be discouraged if your first attempt doesn’t look like a masterpiece. Baking is both a science and an art, and with each try, you’ll improve your skills and develop your unique style.
So, gather your ingredients, preheat that oven, and embark on your journey to create a delicious Victoria Sponge Cake that will evoke smiles and warm hearts. Enjoy the process and, of course, the delightful outcome as you savor each bite of this classic British dessert.