Fermentation is one of humanity’s oldest food preservation techniques, transforming simple ingredients into tangy, probiotic-rich delights. From crunchy dill pickles to spicy kimchi, homemade pickles and fermented foods offer unparalleled flavor, nutrition, and satisfaction. Making these at home is not only cost-effective but also allows you to customize textures and tastes to your liking. Whether you’re a novice or a seasoned fermenter, this guide will walk you through the essentials—why fermentation works, what you’ll need, and step-by-step methods to create your own pickles and fermented foods.
Why Ferment at Home?
Fermentation is a natural process where microorganisms like bacteria and yeast break down sugars and starches into acids, alcohol, or gases. For pickling and fermented foods, lactic acid bacteria (LAB) are the stars of the show. These beneficial microbes preserve food, enhance flavor, and boost gut health by providing probiotics.
Store-bought pickles often rely on vinegar and heat processing, which kills off beneficial bacteria. Homemade fermentation, on the other hand, harnesses the power of live cultures, giving you a product that’s both tastier and healthier. Plus, it’s eco-friendly—reducing reliance on single-use packaging—and lets you experiment with seasonal produce.
In this article, we’ll cover two main categories: classic salt-brine pickles (like dill pickles) and other fermented foods (like sauerkraut and kimchi). Let’s dive into the tools, ingredients, and techniques you’ll need to get started.
Tools and Equipment
You don’t need a fancy setup to ferment at home, but a few basic tools make the process smoother and safer:
- Glass Jars: Mason jars or wide-mouth canning jars (quart or half-gallon sizes) are ideal. Glass is non-reactive and lets you monitor the process.
- Weights: Fermentation weights, clean stones, or small glass dishes keep vegetables submerged in brine, preventing mold.
- Lids: Regular jar lids work, but airlock lids or fermentation lids with vents allow gases to escape without letting oxygen in.
- Mixing Bowl: For preparing vegetables and brine.
- Sharp Knife or Mandoline: For uniform slicing.
- Measuring Cups and Spoons: Precision matters when making brine.
- Clean Towels: To cover jars or wipe spills.
- Optional: A fermentation crock for larger batches or a pH meter to test acidity (though taste usually suffices).
Sanitize everything with hot water and soap—or a vinegar rinse—to avoid unwanted bacteria. Now, let’s gather the ingredients.
Core Ingredients
Fermentation is beautifully simple, relying on just a few components:
- Vegetables: Cucumbers for pickles, cabbage for sauerkraut, or a mix of radishes, carrots, and napa cabbage for kimchi. Fresh, firm produce works best.
- Salt: Non-iodized salt (sea salt, kosher salt, or pickling salt) is crucial. Iodine and anti-caking agents in table salt can inhibit fermentation or cloud brine.
- Water: Filtered or spring water is ideal since chlorine in tap water can kill good bacteria.
- Spices and Herbs: Dill, garlic, mustard seeds, peppercorns, or chili flakes add flavor. Use fresh or dried, depending on the recipe.
- Optional Starters: Whey, brine from a previous batch, or a commercial culture can jumpstart fermentation, though they’re not necessary.
With these in hand, you’re ready to start. Below are detailed instructions for making pickles and two other fermented favorites.
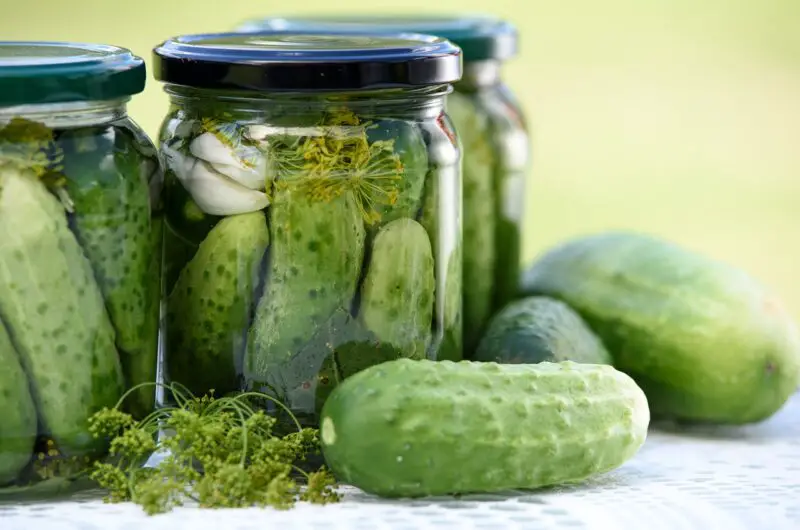
Recipe 1: Classic Dill Pickles
Dill pickles are a gateway to fermentation—crisp, tangy, and packed with garlicky goodness. This recipe makes about one quart.
Ingredients
- 1–1.5 lbs small cucumbers (Kirby or Persian work best)
- 2 cups water
- 1.5 tablespoons non-iodized salt
- 2–3 garlic cloves, peeled
- 1 tablespoon dill seeds (or 2–3 fresh dill sprigs)
- 1 teaspoon black peppercorns
- Optional: 1 grape leaf or tea bag (for extra crispness, due to tannins)
Steps
- Prepare the Cucumbers: Wash cucumbers thoroughly. Trim off the blossom end (it contains enzymes that soften pickles). Leave whole, halve, or slice into spears.
- Make the Brine: Dissolve salt in water. A 3–5% salt concentration (about 1.5–2 tbsp per quart) is ideal for lacto-fermentation. Stir until clear.
- Pack the Jar: Place garlic, dill, peppercorns, and grape leaf (if using) at the bottom of a clean jar. Pack cucumbers tightly, leaving 1–2 inches of headspace.
- Add Brine: Pour brine over the cucumbers until fully submerged. Use a weight to keep them below the liquid.
- Cover and Ferment: Seal loosely with a lid or use an airlock. Place the jar in a cool, dark spot (60–75°F is ideal). Check daily for bubbles—a sign fermentation has begun.
- Monitor and Taste: Fermentation takes 3–14 days, depending on temperature and taste preference. Taste after 3 days; when tangy enough, move to the fridge.
- Store: Refrigerate for up to 6 months. The flavor deepens over time.
Tips
- Small, firm cucumbers yield the best texture.
- If brine gets cloudy, that’s normal—lactic acid bacteria are at work.
- Skim any surface scum (not mold) daily to keep it clean.
Recipe 2: Sauerkraut
Sauerkraut is fermented cabbage at its finest—simple, versatile, and loaded with probiotics. This makes about one quart.
Ingredients
- 1 medium head of cabbage (about 2 lbs)
- 1 tablespoon non-iodized salt
- Optional: 1 teaspoon caraway seeds or juniper berries
Steps
- Prep the Cabbage: Remove outer leaves and core. Shred finely with a knife or mandoline.
- Salt and Massage: In a bowl, sprinkle salt over cabbage. Massage with clean hands for 5–10 minutes until it releases juice and feels wet.
- Pack the Jar: Transfer cabbage to a jar, pressing down firmly with your fist or a tamper. Liquid should rise above the cabbage. Add caraway seeds if using.
- Weigh Down: Place a weight on top to keep cabbage submerged in its own brine. Add a splash of saltwater (1 tsp salt per cup water) if needed.
- Ferment: Cover loosely and store at 60–75°F. Bubbles will appear in 1–3 days. Ferment for 1–4 weeks, tasting weekly until it’s sour enough.
- Store: Seal and refrigerate. It keeps for months and improves with age.
Tips
- Too much headspace can lead to mold; keep it minimal.
- A funky smell is normal, but discard if you see fuzzy mold or detect a rancid odor.
Recipe 3: Basic Kimchi
Kimchi, Korea’s iconic fermented dish, blends spice, funk, and crunch. This version is beginner-friendly and makes about one quart.
Ingredients
- 1 head napa cabbage (about 2 lbs)
- 1/4 cup non-iodized salt
- 1 small daikon radish, julienned
- 2–3 green onions, chopped
- 3 garlic cloves, minced
- 1-inch piece ginger, grated
- 2–4 tablespoons Korean red pepper flakes (gochugaru)
- 1 teaspoon sugar (optional, to feed fermentation)
- 1 tablespoon fish sauce or soy sauce (optional)
Steps
- Salt the Cabbage: Cut cabbage into quarters, remove the core, and chop into bite-sized pieces. In a bowl, toss with salt and let sit for 1–2 hours until wilted. Rinse well and drain.
- Make the Paste: Mix garlic, ginger, red pepper flakes, sugar, and fish sauce into a thick paste.
- Combine: In a bowl, toss cabbage, radish, and green onions with the paste until evenly coated. Wear gloves if sensitive to spice!
- Pack the Jar: Press the mixture tightly into a jar, leaving 1–2 inches of headspace. Liquid should rise slightly; add a bit of saltwater if needed.
- Ferment: Cover loosely and keep at 60–75°F. Check daily, pressing down to submerge. Ferment for 3–7 days, tasting for desired tanginess.
- Store: Refrigerate once ready. It’s good for weeks and gets spicier over time.
Tips
- Adjust spice to taste—gochugaru varies in heat.
- Burp the jar daily to release pressure from active fermentation.
The Science Behind Fermentation
Fermentation is a microbial dance. Lactic acid bacteria, naturally present on vegetables, thrive in a salty, oxygen-free environment. They convert sugars into lactic acid, lowering the pH and preserving the food. This acidic environment kills off harmful bacteria while creating that signature tang.
Temperature plays a key role: 60–75°F speeds up fermentation, while cooler temps (like in a fridge) slow it down for long-term storage. Too much salt halts the process; too little invites spoilage. Aim for balance.
Troubleshooting Common Issues
- Mold: Fuzzy growth means discard the batch. White film (kahm yeast) is harmless—skim it off.
- Soft Pickles: Overripe cucumbers or insufficient salt are culprits. Use fresh produce and proper ratios.
- No Bubbles: Cold temps or chlorinated water may stall fermentation. Move to a warmer spot or use filtered water.
Health Benefits
Fermented foods are probiotic powerhouses, supporting digestion, immunity, and even mental health via the gut-brain axis. They’re rich in vitamins (like C and K in sauerkraut) and enzymes that aid nutrient absorption. Moderation is key—too much can upset sensitive stomachs.
Customization Ideas
Experimentation is half the fun:
- Add beets or turmeric for color.
- Try fennel, coriander, or bay leaves for unique flavors.
- Mix veggies—think carrots with cucumbers or cauliflower in kimchi.
Final Thoughts
Making homemade pickles and fermented foods is a rewarding blend of science, art, and patience. Start small with a jar of dill pickles, then branch out to sauerkraut or kimchi as confidence grows. The process connects you to ancient traditions while delivering modern health benefits. So grab some veggies, salt, and a jar—your fermentation journey begins now!
References and Further Reading
- Katz, Sandor Ellix.The Art of Fermentation: An In-Depth Exploration of Essential Concepts and Processes from Around the World. Chelsea Green Publishing, 2012.
- A comprehensive guide to fermentation, covering techniques, science, and recipes from pickles to kimchi.
- Shockey, Kirsten K., and Christopher Shockey.Fermented Vegetables: Creative Recipes for Fermenting 64 Vegetables & Herbs in Krauts, Kimchis, Brined Pickles, Chutneys, Relishes & Pastes. Storey Publishing, 2014.
- A practical resource with detailed instructions for beginners and advanced fermenters alike.
- Lewin, Alex.Real Food Fermentation: Preserving Whole Fresh Food with Live Cultures in Your Home Kitchen. Quarry Books, 2012.
- An accessible introduction to fermentation with step-by-step photos and recipes.
- National Center for Home Food Preservation. “How Do I? …Ferment.” University of Georgia. https://nchfp.uga.edu/how/ferment.html (Accessed February 21, 2025).
- A science-based resource for safe fermentation practices, including brine ratios and troubleshooting.
- Benson, Amanda. “Lacto-Fermentation Basics.” Cultures for Health. https://www.culturesforhealth.com/learn/natural-fermentation/lacto-fermentation-basics/ (Accessed February 21, 2025).
- A beginner-friendly online guide to the principles of lacto-fermentation.
- Fellows, Peter.Food Processing Technology: Principles and Practice. 4th ed., Woodhead Publishing, 2016.
- A technical reference on food preservation, including the microbiology of fermentation.
- Lee, Cherie. “The Science of Kimchi Fermentation.” Korean Journal of Food Science and Technology, vol. 45, no. 3, 2013, pp. 267–273.
- A peer-reviewed study on the microbial processes behind kimchi, for those interested in the science.
- USDA Complete Guide to Home Canning. United States Department of Agriculture, 2015 revision. https://nchfp.uga.edu/publications/publications_usda.html (Accessed February 21, 2025).
- Includes guidelines on pickling and fermentation safety.
