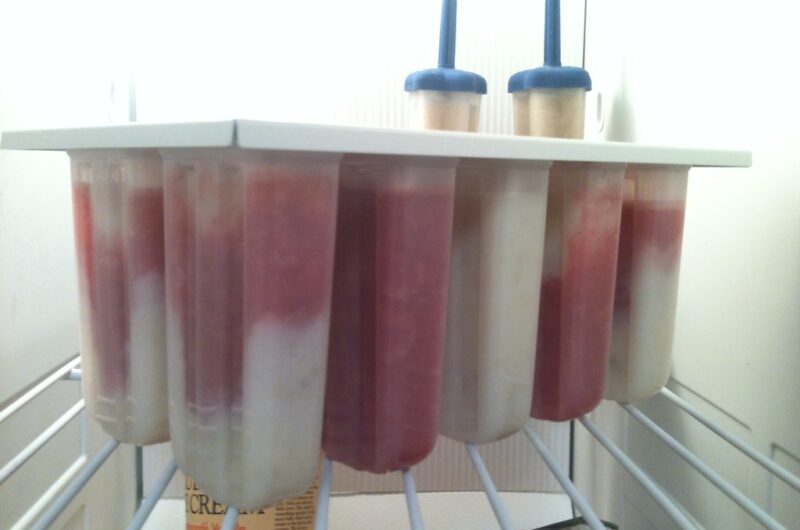
There’s nothing quite like a refreshing popsicle on a hot day—or any day, really. Whether you’re whipping up a batch of fruity homemade treats for the kids, experimenting with boozy pops for a grown-up twist, or just craving a quick frozen dessert, waiting for them to freeze can feel like an eternity. The good news? You don’t have to sit around twiddling your thumbs for hours. With a few clever, science-backed tricks, you can speed up the freezing process and enjoy your popsicles faster.
In this article, we’ll dive into the science of freezing, explore why popsicles take time to solidify, and share practical, easy-to-apply tips to cut down that wait time. From tweaking your recipe to optimizing your freezer, these methods are rooted in basic thermodynamics and chemistry—don’t worry, we’ll keep it simple and fun. Let’s get started!
The Science Behind Freezing Popsicles
Before we jump into the hacks, let’s take a quick look at what’s happening when your popsicle mixture turns from liquid to solid. Freezing is all about removing heat energy from the liquid until its molecules slow down enough to form a solid structure—ice, in this case. Water, the main ingredient in most popsicle recipes, freezes at 32°F (0°C) under normal conditions. But popsicles aren’t just water; they’re a mix of water, sugar, flavorings, and sometimes other ingredients like fruit puree or alcohol. These extras complicate the process.
Here’s why: Adding sugar or other solutes lowers the freezing point of water—a phenomenon called freezing point depression. The more sugar (or alcohol) in your mix, the colder it needs to get before it freezes solid. That’s why a sugary popsicle takes longer to freeze than plain ice cubes. Temperature, mixture composition, and even the environment in your freezer all play a role in how fast your popsicles set.
Armed with this basic understanding, let’s explore some actionable tips to speed things up.
Tip 1: Start with a Cold Mixture
One of the simplest ways to make popsicles freeze faster is to start with a mixture that’s already cold. If you pour a room-temperature or warm liquid into your molds, your freezer has to work harder (and longer) to bring the temperature down to the freezing point. By chilling your mixture beforehand, you give it a head start.
How to Do It:
- After preparing your popsicle base—whether it’s juice, a smoothie blend, or a homemade syrup—pop it in the fridge for 30-60 minutes before pouring it into molds.
- If you’re in a rush, stick the mixture in the freezer for 10-15 minutes instead. Just don’t let it start freezing solid before you pour it!
- For an even quicker chill, place your mixing bowl or pitcher in a larger bowl filled with ice water and stir for a few minutes. This rapid-cooling trick, borrowed from chefs, works wonders.
Why It Works: Heat transfer is faster when there’s a bigger temperature difference between your mixture and the freezer’s cold air. A chilled mixture is already closer to 32°F (0°C), so your freezer has less work to do.
Tip 2: Lower the Sugar Content (Just a Little)
Sugar makes popsicles deliciously sweet, but as we mentioned earlier, it also slows down freezing by lowering the freezing point. The more sugar in your recipe, the longer it takes to solidify. While you don’t want to sacrifice flavor, a slight tweak to the sugar level can shave off some freezing time.
How to Do It:
- If your recipe calls for a lot of sugar (like in a syrup-based popsicle), reduce it by 10-20%. Taste-test to ensure it’s still enjoyable.
- Swap out some sugar for a natural sweetener like honey or agave, which can have a less dramatic effect on freezing point in small amounts.
- Use fruit purees with natural sugars (like mango or strawberry) instead of adding extra granulated sugar or syrup.
Why It Works: Less sugar means a higher freezing point, so the mixture solidifies at a slightly warmer temperature. Don’t overdo it, though—too little sugar can make your popsicles rock-hard and less palatable.
Tip 3: Use Smaller Molds
The size and shape of your popsicle molds can make a surprising difference in freezing time. Larger molds take longer to freeze because the cold has to penetrate deeper into the mixture. Smaller, thinner popsicles freeze faster since there’s less volume to chill.
How to Do It:
- Opt for slim, narrow molds instead of chunky, oversized ones. Think classic popsicle sticks rather than giant novelty shapes.
- If you only have large molds, fill them halfway to reduce the volume of liquid per popsicle.
- Bonus: Smaller popsicles are perfect for quick snacks or portion control!
Why It Works: Freezing happens from the outside in. A smaller volume means less distance for the cold to travel, and the center of the popsicle freezes more quickly. This is basic heat transfer in action—less mass equals faster cooling.
Tip 4: Boost Your Freezer’s Power
Your freezer’s temperature is a major factor in how fast popsicles freeze. Most home freezers are set to around 0°F (-18°C), which is plenty cold for food storage but not optimized for speed-freezing. Cranking up the chill can make a noticeable difference.
How to Do It:
- Check your freezer’s temperature with a thermometer (or its digital display, if it has one). If it’s warmer than 0°F (-18°C), adjust the dial to the coldest setting.
- Give your freezer a few hours to stabilize at the lower temperature before popping in your molds.
- Avoid opening the freezer door too often while the popsicles are setting—every blast of warm air slows things down.
Why It Works: The colder the environment, the faster heat is pulled out of your popsicle mixture. At -10°F (-23°C) or lower, freezing happens significantly quicker than at 0°F (-18°C). Just don’t forget to readjust the temperature later if you’re worried about energy costs!
Tip 5: Add a Tiny Bit of Alcohol (Yes, Really!)
This might sound counterintuitive since alcohol lowers the freezing point, but hear us out. A small amount of alcohol can actually help popsicles freeze faster by improving heat transfer within the mixture.
How to Do It:
- Add 1-2 teaspoons of a high-proof spirit (like vodka or rum) per cup of popsicle mixture. Stick to neutral flavors unless you want a boozy twist.
- Stir it in thoroughly before pouring into molds.
- Note: This works best for kid-friendly popsicles in tiny amounts—too much alcohol will prevent freezing altogether.
Why It Works: Alcohol has a lower freezing point than water, but in small quantities, it acts as a “cryoprotectant,” helping water molecules organize into ice crystals more efficiently. It’s a delicate balance—overdo it, and you’ll end up with a slushy mess instead of a solid popsicle.
Tip 6: Use Metal Molds or Trays
The material of your popsicle molds matters more than you might think. Plastic molds are common and affordable, but they’re not the best conductors of cold. Metal, on the other hand, transfers heat (or removes it) much more effectively.
How to Do It:
- Invest in stainless steel or aluminum popsicle molds—they’re durable and widely available online.
- If you don’t have metal molds, place your plastic molds on a metal baking sheet or tray before sliding them into the freezer.
- Avoid glass molds, which insulate rather than conduct cold.
Why It Works: Metal conducts heat away from the popsicle mixture faster than plastic or silicone, speeding up the freezing process. It’s the same reason chefs use metal pans for quick chilling in ice baths.
Tip 7: Maximize Airflow in the Freezer
A crowded freezer can slow down freezing by blocking cold air from circulating around your popsicle molds. Good airflow is key to efficient heat removal.
How to Do It:
- Clear a space in the center or near the back of your freezer, where it’s coldest, and place your molds there.
- Avoid stacking items around or on top of the molds—give them breathing room.
- If your freezer has a fan (common in modern models), position the molds where the air can hit them directly.
Why It Works: Cold air needs to move freely to pull heat out of the popsicle mixture. A cramped freezer traps warm air pockets, slowing the process. Think of it like giving your popsicles a refreshing breeze to chill out faster.
Tip 8: Pre-Freeze the Molds
Here’s a pro tip: Chill your molds before filling them. Cold molds start pulling heat out of the mixture the moment you pour it in, giving you a jumpstart on freezing.
How to Do It:
- Pop your empty molds (without sticks) in the freezer for 15-30 minutes before use.
- Pour in your chilled mixture, add sticks, and get them back in the freezer pronto.
- This pairs perfectly with Tip 1 (starting with a cold mixture).
Why It Works: Pre-chilled molds act like a cold sponge, absorbing heat from the liquid immediately. It’s a small step that adds up to faster results.
Tip 9: Try a Quick-Freeze Hack with Ice or Dry Ice
If you’re really in a hurry, you can supercharge the freezing process with an ice bath or even dry ice (if you’re feeling adventurous and have access to it).
How to Do It:
- Fill a shallow container with ice and water, then submerge your filled molds halfway for 10-15 minutes before transferring them to the freezer.
- For dry ice: Place a small piece in a ventilated container in your freezer (safely away from food) to drop the temperature dramatically. Handle with gloves and follow safety guidelines—dry ice is extreme!
- Note: These methods are overkill for most situations but great for emergencies.
Why It Works: Ice baths pull heat out faster than air alone, while dry ice (-109°F/-78°C) creates an ultra-cold environment that freezes popsicles in record time. It’s science on steroids!
Putting It All Together: A Sample Speed-Freeze Recipe
Let’s combine these tips into a fast-freezing popsicle recipe you can try at home.
Quick-Freeze Strawberry-Lime Popsicles
- Ingredients: 2 cups fresh strawberry puree, 1 cup water, ¼ cup sugar, 1 tablespoon lime juice, 1 teaspoon vodka (optional).
- Steps:
- Blend ingredients and chill the mixture in the fridge for 30 minutes.
- Pre-freeze metal molds for 15 minutes.
- Pour the chilled mixture into the molds, add sticks, and place on a metal tray in a cleared-out, 0°F (-18°C) freezer.
- Check after 2-3 hours—enjoy!
With these tweaks, you’ll cut freezing time from 4-6 hours to as little as 2-3 hours.
Final Thoughts
Making popsicles freeze faster doesn’t require a PhD in physics—just a few smart adjustments based on how heat and cold interact. Whether you’re chilling your mixture, tweaking the recipe, or optimizing your freezer setup, these tips can turn a long wait into a quick reward. Experiment with what works best for you, and soon you’ll be savoring your frozen treats faster than ever.
So next time you’re craving a popsicle, don’t let the clock hold you back. Try these science-backed hacks, and enjoy the fruits (or flavors) of your labor in record time.
