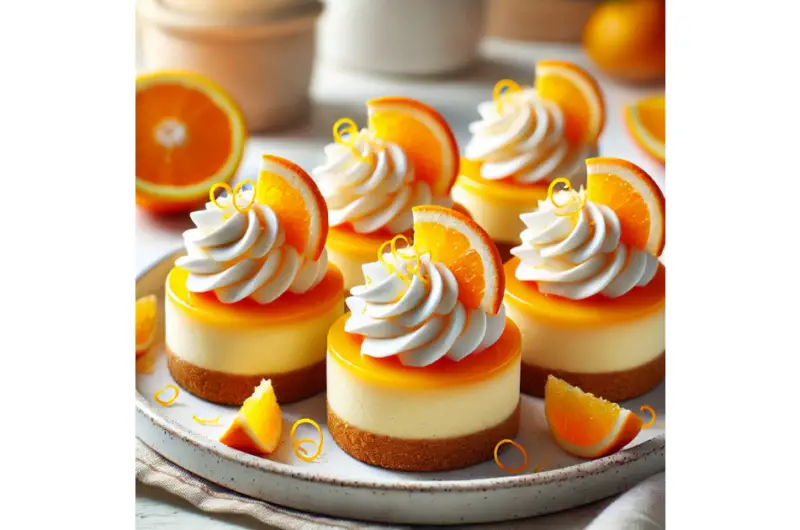
There’s something undeniably charming about the combination of orange and cream—a flavor duo that likely takes many of us back to childhood summers spent chasing down the ice cream truck for an orange creamsicle. That tangy citrus burst paired with velvety vanilla cream is pure nostalgia in every bite. Now, imagine transforming that beloved treat into a sophisticated yet approachable dessert: Orange Creamsicle Mini Cheesecakes. These individual-sized delights bring together the best of both worlds—the lusciousness of cheesecake and the playful zing of a creamsicle—all wrapped up in a graham cracker crust.
In this article, we’ll explore how to make these mini cheesecakes from scratch, including a detailed recipe, pro tips to ensure they turn out perfectly, and ideas for customizing them to suit your taste. Whether you’re a seasoned baker or a kitchen newbie, this recipe is designed to be approachable, fun, and absolutely delicious. Plus, their petite size makes them ideal for sharing (or not—treat yourself!).
Why Mini Cheesecakes?
Before we get into the recipe, let’s talk about why mini cheesecakes are such a fantastic choice. Full-sized cheesecakes, while impressive, can be intimidating to make and often require a water bath, precise timing, and a bit of patience to avoid cracks. Mini cheesecakes, on the other hand, are far more forgiving. They bake quickly, cool faster, and don’t need the same level of fussing. Plus, they’re portion-controlled, making them perfect for parties, potlucks, or when you just want a small indulgence without committing to a whole cake.
The orange creamsicle twist adds a layer of fun and flavor that sets these apart from traditional cheesecake bites. The bright citrus cuts through the richness of the cream cheese, while a touch of vanilla keeps that classic creamsicle vibe alive. Ready to get started? Let’s break it down.
Recipe: Orange Creamsicle Mini Cheesecakes
Yield: 12 mini cheesecakes
Prep Time: 20 minutes
Cook Time: 20-25 minutes
Chill Time: 2-4 hours
Total Time: Approximately 3 hours
Ingredients
For the Graham Cracker Crust:
- 1 cup graham cracker crumbs (about 8-10 full graham crackers)
- 2 tablespoons granulated sugar
- 4 tablespoons unsalted butter, melted
- Pinch of salt
For the Cheesecake Filling:
- 16 ounces (2 blocks) full-fat cream cheese, softened to room temperature
- ⅔ cup granulated sugar
- 2 large eggs, room temperature
- 1 teaspoon vanilla extract
- 1 tablespoon orange zest (from 1 large orange)
- 2 tablespoons freshly squeezed orange juice
- 1-2 drops orange food coloring (optional, for that creamsicle look)
- ½ cup sour cream or Greek yogurt, room temperature
For the Orange Cream Topping (Optional):
- ½ cup heavy whipping cream
- 2 tablespoons powdered sugar
- 1 teaspoon orange zest
- ½ teaspoon vanilla extract
Optional Garnishes:
- Whipped cream
- Orange slices or zest curls
- White chocolate shavings
Equipment Needed
- 12-cup standard muffin tin
- Paper liners or non-stick cooking spray
- Mixing bowls
- Electric mixer (handheld or stand)
- Rubber spatula
- Measuring cups and spoons
- Zester or microplane
- Cooling rack
Instructions
Step 1: Prepare the Crust
- Preheat your oven to 325°F (163°C). Line a 12-cup muffin tin with paper liners or lightly grease each cup with non-stick spray.
- If starting with whole graham crackers, pulse them in a food processor until finely ground, or place them in a zip-top bag and crush them with a rolling pin.
- In a medium bowl, combine the graham cracker crumbs, sugar, melted butter, and a pinch of salt. Stir until the mixture resembles wet sand and holds together when pressed.
- Spoon about 1 tablespoon of the crust mixture into each muffin cup. Use the back of a spoon or your fingers to press it firmly into an even layer.
- Bake the crusts for 5 minutes to set, then remove from the oven and let them cool slightly while you prepare the filling.
Step 2: Make the Cheesecake Filling
- In a large mixing bowl, beat the softened cream cheese with an electric mixer on medium speed until smooth and creamy, about 1-2 minutes. Scrape down the sides of the bowl as needed.
- Add the granulated sugar and beat for another minute until fully incorporated.
- Add the eggs one at a time, mixing on low speed just until combined. Overmixing can incorporate too much air, leading to cracks or uneven texture.
- Mix in the vanilla extract, orange zest, orange juice, and sour cream (or Greek yogurt) until smooth. If using food coloring, add 1-2 drops now and gently stir to achieve a soft orange hue.
- Taste the batter and adjust the orange flavor if desired by adding a bit more zest or juice—keep it subtle to maintain that creamsicle balance.
Step 3: Assemble and Bake
- Spoon the cheesecake filling over the pre-baked crusts, filling each muffin cup almost to the top (about 2-3 tablespoons per cup). The batter will rise slightly during baking but settle as it cools.
- Bake at 325°F (163°C) for 20-25 minutes, or until the edges are set and the centers have a slight jiggle. Avoid overbaking—mini cheesecakes firm up as they cool.
- Turn off the oven, crack the door slightly, and let the cheesecakes cool in the oven for 10-15 minutes to prevent sudden temperature changes that could cause sinking.
- Remove from the oven and transfer the muffin tin to a wire rack to cool completely at room temperature, about 1 hour.
Step 4: Chill
- Once cooled, cover the muffin tin with plastic wrap or transfer the cheesecakes to an airtight container. Refrigerate for at least 2-4 hours, or overnight, to fully set and develop flavor.
Step 5: Optional Orange Cream Topping
- In a chilled mixing bowl, whip the heavy cream, powdered sugar, orange zest, and vanilla extract with an electric mixer on high speed until soft peaks form, about 2-3 minutes.
- Spoon or pipe the whipped cream onto the chilled cheesecakes just before serving for an extra creamsicle-inspired touch.
Step 6: Serve and Garnish
- Gently remove the cheesecakes from the muffin tin by lifting the paper liners or running a knife around the edges if unlined.
- Garnish with a dollop of whipped cream, a sprinkle of orange zest, a small orange slice, or a few white chocolate shavings for a pretty finish.
- Serve chilled and enjoy!
Tips for Perfect Mini Cheesecakes
- Room Temperature Ingredients: Ensure your cream cheese, eggs, and sour cream are at room temperature. This prevents lumps and ensures a smooth, creamy filling.
- Don’t Overmix: Overbeating the batter after adding the eggs can introduce too much air, leading to cracks or uneven baking.
- Fresh Orange Flavor: Use freshly squeezed orange juice and zest for the brightest flavor. Bottled juice can work in a pinch but lacks the same vibrancy.
- Avoid Overbaking: The centers should still jiggle slightly when you remove them from the oven—they’ll firm up as they chill.
- Make Ahead: These cheesecakes can be made 1-2 days in advance and stored in the fridge, making them a stress-free dessert for gatherings.
The Inspiration: A Brief History of the Orange Creamsicle
The orange creamsicle has roots dating back to the early 20th century, tied to the rise of ice cream novelties in America. The original creamsicle, created by the Popsicle brand, debuted in the 1920s as a creamy, vanilla ice cream core coated in a tangy orange-flavored ice shell. It was an instant hit, offering a refreshing yet indulgent treat that appealed to kids and adults alike. The combination of citrus and cream became iconic, inspiring countless variations over the decades, from sodas to candies.
Fast forward to today, and the creamsicle flavor profile remains a beloved classic. By reimagining it as a mini cheesecake, we elevate the nostalgic treat into something a little more refined while keeping its playful spirit intact. The graham cracker crust adds a toasty crunch, the cheesecake filling brings richness, and the orange zest ties it all together with that signature pop.
Variations and Customizations
Want to switch things up? Here are some ideas to make this recipe your own:
- Chocolate Twist: Swap the graham cracker crust for crushed chocolate cookies (like Oreos) and drizzle the tops with melted dark chocolate.
- Boozy Version: Add 1-2 teaspoons of orange liqueur (like Grand Marnier) to the filling for a subtle kick.
- Berry Blend: Mix in a swirl of raspberry or strawberry puree for a fruity contrast.
- No-Bake Option: Skip the baking by chilling the crusts, then setting the filling (with added gelatin) in the fridge for 4-6 hours.
- Gluten-Free: Use gluten-free graham crackers or almond flour for the crust.
Storing and Serving
- Refrigerator: Store mini cheesecakes in an airtight container in the fridge for up to 5 days. Add toppings just before serving to keep them fresh.
- Freezer: Freeze unglazed cheesecakes in a single layer on a baking sheet until solid, then transfer to a freezer-safe container for up to 2 months. Thaw in the fridge overnight before serving.
Why You’ll Love These Mini Cheesecakes
Orange Creamsicle Mini Cheesecakes are the perfect blend of nostalgia and sophistication. They’re easy to make, endlessly customizable, and guaranteed to bring smiles to the table. The creamy texture, zesty orange notes, and buttery crust create a harmony of flavors and textures that’s hard to resist. Plus, their mini size means you can enjoy one (or two!) without guilt.
So, the next time you’re craving a dessert that’s equal parts fun and fancy, give this recipe a try. Whether you’re serving them at a summer picnic, a holiday party, or just treating yourself on a quiet evening, these little bites of sunshine are sure to become a new favorite. Happy baking!
