Candy apples are a timeless treat, evoking memories of autumn fairs, Halloween parties, and cozy family gatherings.
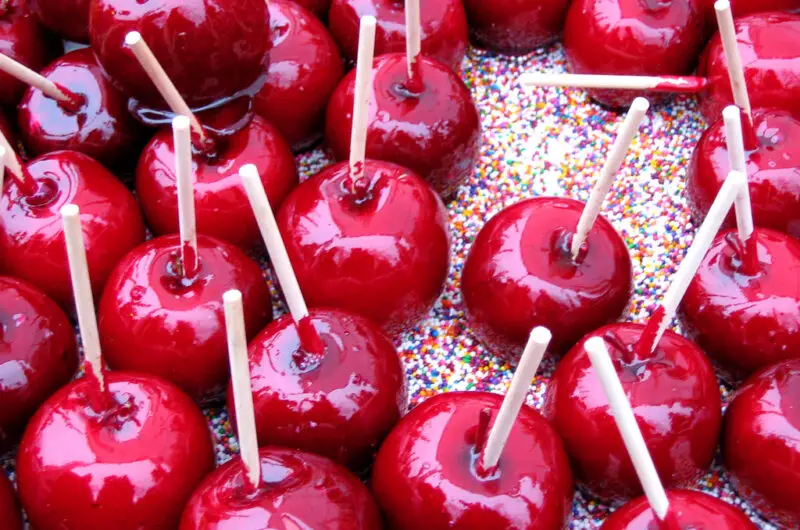
With their glossy, vibrant coatings and satisfying crunch, they strike a perfect balance between fruit and confection.
Whether you’re a novice in the kitchen or an experienced home cook, candy apples offer endless opportunities for creativity. In this article, we’ll dive into the history of candy apples, explore a variety of recipes—from classic red candy apples to modern twists like chocolate-dipped or caramel-coated versions—and share tips to ensure your candy apples turn out perfectly every time.
A Brief History of Candy Apples
The candy apple’s origin story begins in the early 20th century, credited to William Kolb, a candymaker from Newark, New Jersey. In 1908, Kolb was experimenting with a red cinnamon candy coating for Christmas sales when he decided to dip apples into the mixture as a display gimmick. To his surprise, customers weren’t just admiring the shiny apples—they wanted to buy them. Thus, the candy apple was born. By the 1950s and ‘60s, candy apples had become a staple at carnivals, county fairs, and Halloween celebrations across the United States.
While the classic red candy apple remains iconic, modern variations have expanded the treat’s appeal. Today, you’ll find candy apples coated in caramel, chocolate, or even sprinkled with nuts, sprinkles, or crushed candies. This versatility makes them a delightful project for any season or occasion.
The Basics: What You’ll Need
Before diving into recipes, let’s cover the essentials. Candy apples require just a few ingredients and tools, but precision is key to achieving that signature glossy finish. Here’s what you’ll need for most recipes:
- Apples: Choose firm, crisp varieties like Granny Smith, Honeycrisp, or Fuji. Smaller apples work best for even coating and easier eating.
- Wooden sticks or skewers: These replace the apple stem for dipping and handling.
- Candy thermometer: Essential for monitoring the temperature of your coating.
- Heavy-bottomed saucepan: Ensures even heating of the candy mixture.
- Parchment paper or silicone mat: Prevents sticking as the apples cool.
- Basic ingredients: Sugar, corn syrup, water, and food coloring are staples for the classic recipe, with variations calling for additional items like chocolate or cream.
Now, let’s explore some irresistible candy apple recipes, starting with the classic and moving on to creative spins.
Recipe 1: Classic Red Candy Apples
The quintessential candy apple features a bright red, hard candy shell with a hint of sweetness that complements the tartness of the apple. This recipe yields about 6-8 apples, depending on their size.
Ingredients
- 6-8 medium apples (Granny Smith recommended)
- 2 cups granulated sugar
- 1 cup light corn syrup
- ¾ cup water
- 1 teaspoon red food coloring (gel or liquid)
- ½ teaspoon cinnamon extract (optional, for a spiced twist)
- Wooden sticks or skewers
Instructions
- Prepare the Apples: Wash the apples thoroughly under warm water to remove any wax coating, which can prevent the candy from sticking. Dry them completely with a clean towel. Remove the stems and insert a wooden stick into the top of each apple, pressing it firmly about halfway through.
- Set Up Your Workspace: Line a baking sheet with parchment paper or a silicone mat and lightly grease it with cooking spray or butter to prevent sticking. Place it near your stove for easy access.
- Make the Candy Coating: In a heavy-bottomed saucepan, combine the sugar, corn syrup, and water over medium heat. Stir until the sugar dissolves, then stop stirring and attach a candy thermometer to the pot. Bring the mixture to a boil and cook until it reaches the hard-crack stage (300°F to 310°F, or 149°C to 154°C), about 15-20 minutes.
- Add Color and Flavor: Once the mixture hits 300°F, remove it from the heat immediately. Stir in the red food coloring and cinnamon extract (if using) until fully incorporated. Work quickly, as the candy will start to harden.
- Dip the Apples: Holding an apple by the stick, dip it into the hot candy mixture, tilting the pot if needed to coat it evenly. Twirl the apple to remove excess candy and place it upright on the prepared baking sheet. Repeat with the remaining apples.
- Cool and Set: Let the apples cool at room temperature for about 30-60 minutes until the candy shell hardens completely. Avoid refrigerating, as it can make the coating sticky.
Tips for Success
- Work fast after removing the candy from heat, as it thickens quickly.
- If bubbles form on the coating, reduce the heat slightly during cooking to minimize air incorporation.
- Store finished apples in a cool, dry place for up to a month, though they’re best enjoyed within a few days.
Recipe 2: Caramel Candy Apples
For a softer, chewier alternative, caramel apples are a crowd-pleaser. This recipe adds a buttery richness that pairs beautifully with crisp apples.
Ingredients
- 6-8 medium apples (Honeycrisp or Fuji work well)
- 1 cup unsalted butter
- 2 cups packed brown sugar
- 1 cup light corn syrup
- 1 can (14 oz) sweetened condensed milk
- 1 teaspoon vanilla extract
- Pinch of salt
- Optional toppings: chopped nuts, sea salt, or melted chocolate drizzle
- Wooden sticks or skewers
Instructions
- Prep the Apples: Wash and dry the apples, remove the stems, and insert wooden sticks as in the classic recipe. Place a parchment-lined baking sheet nearby.
- Cook the Caramel: In a heavy saucepan, melt the butter over medium heat. Add the brown sugar, corn syrup, and sweetened condensed milk, stirring constantly until combined. Attach a candy thermometer and cook the mixture, stirring occasionally, until it reaches 245°F (118°C)—the firm-ball stage—about 15-20 minutes.
- Flavor the Caramel: Remove from heat and stir in the vanilla extract and salt. Let the caramel cool slightly for 2-3 minutes (it should still be pourable but not scalding hot).
- Dip the Apples: Dip each apple into the caramel, twirling to coat evenly. Allow excess caramel to drip off, then place the apple on the baking sheet. If adding toppings like nuts or salt, sprinkle them on immediately while the caramel is sticky.
- Optional Chocolate Drizzle: For an extra indulgence, melt ½ cup of chocolate chips with 1 teaspoon of vegetable oil, then drizzle over the cooled caramel apples using a spoon or piping bag.
- Cool and Enjoy: Let the apples set at room temperature for about an hour. Store in the refrigerator for up to two weeks, but bring to room temperature before serving for the best texture.
Tips for Success
- Stir the caramel frequently to prevent scorching, but don’t overmix once it’s boiling to avoid crystallization.
- Use a deep pot to prevent the caramel from boiling over.
- For a thinner coating, dip the apples quickly; for a thicker layer, let more caramel cling to the apple.
Recipe 3: Chocolate-Dipped Candy Apples
For chocolate lovers, this recipe swaps the hard candy shell for a smooth, rich chocolate coating, customizable with your favorite toppings.
Ingredients
- 6-8 medium apples (any crisp variety)
- 2 cups semi-sweet or dark chocolate chips (or a mix)
- 1 tablespoon vegetable oil or shortening
- Optional toppings: crushed pretzels, sprinkles, mini marshmallows, or shredded coconut
- Wooden sticks or skewers
Instructions
- Prepare the Apples: Wash, dry, and insert sticks into the apples as described earlier. Chill the apples in the refrigerator for 15-20 minutes to help the chocolate set faster.
- Melt the Chocolate: In a microwave-safe bowl, combine the chocolate chips and vegetable oil. Microwave in 30-second intervals, stirring between each, until fully melted and smooth. Alternatively, use a double boiler on the stovetop.
- Dip the Apples: Remove the apples from the fridge. Dip each one into the melted chocolate, coating it halfway or fully, depending on your preference. Twirl to remove excess chocolate.
- Add Toppings: While the chocolate is still wet, roll or sprinkle the apples with your chosen toppings. Place them on a parchment-lined baking sheet.
- Set the Chocolate: Refrigerate the apples for 20-30 minutes until the chocolate hardens. Serve chilled or at room temperature.
Tips for Success
- The oil or shortening keeps the chocolate smooth and prevents it from seizing.
- Experiment with white chocolate or milk chocolate for different flavors.
- Store in the fridge for up to a week, wrapped loosely in plastic wrap.
Creative Variations and Presentation Ideas
Candy apples are endlessly adaptable. Here are some ideas to elevate your creations:
- Spiced Candy Apples: Add a pinch of cayenne or nutmeg to the classic candy coating for a warm kick.
- Toffee Apples: Use a toffee recipe (similar to caramel but cooked to a higher temperature) for a brittle, buttery shell.
- Mini Candy Apples: Use a melon baller to scoop small apple spheres, skewer them, and dip for bite-sized treats.
- Holiday Themes: Tint the candy coating green for St. Patrick’s Day, orange for Halloween, or white with red drizzles for winter holidays.
For presentation, wrap each apple in cellophane with a ribbon for gifting, or display them on a tiered stand at parties. Pair with a hot cider or cocoa bar for a cozy event.
Troubleshooting Common Issues
- Candy Won’t Stick: Ensure apples are dry and wax-free. Dip quickly while the candy is hot.
- Coating Too Thick: Thin the mixture with a teaspoon of water or reduce cooking time slightly.
- Sticky Caramel: Cook to a higher temperature (up to 248°F) or let it cool longer before dipping.
Conclusion
Candy apples are more than just a treat—they’re a craft, a tradition, and a canvas for culinary imagination. Whether you stick to the classic red candy shell, indulge in gooey caramel, or experiment with chocolate and toppings, these recipes offer something for everyone. With a little patience and the right techniques, you’ll be whipping up picture-perfect candy apples in no time. So grab your apples, heat up the stove, and let the sweet adventure begin!


