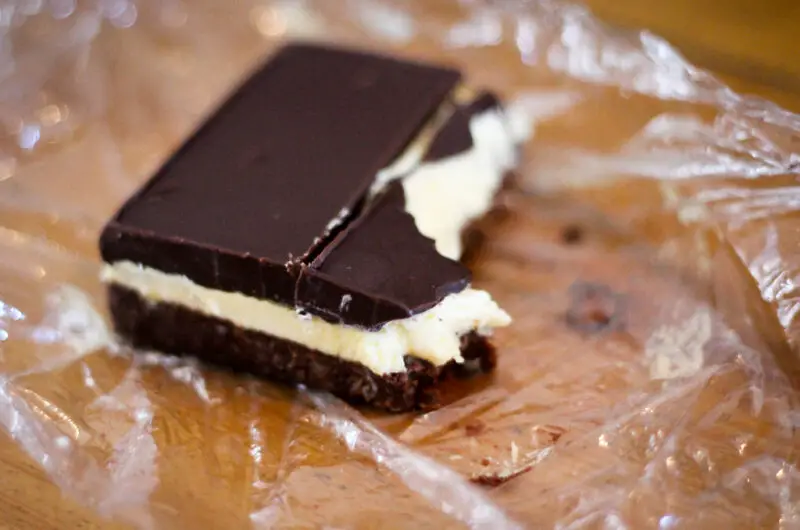
Nanaimo bars are one of Canada’s most beloved desserts, originating from the city of Nanaimo in British Columbia. These no-bake treats feature three distinct layers: a chocolate-coconut-graham cracker crust, a creamy custard-flavored middle layer, and a rich chocolate ganache topping. Their combination of textures and flavors makes them irresistible to dessert lovers worldwide.
In this guide, we’ll provide you with the best Nanaimo bars recipe, complete with step-by-step instructions, variations, and tips to ensure your bars turn out perfect every time.
History of Nanaimo Bars
The origins of Nanaimo bars date back to the 1950s when a local housewife submitted a recipe for a dessert bar to a community cookbook. Over time, this treat gained nationwide popularity, earning its place as an iconic Canadian dessert. The original recipe has evolved, with numerous adaptations appearing across North America. However, the core elements remain the same: a no-bake crust, a custard-flavored filling, and a chocolate topping.
Classic Nanaimo Bars Recipe
Ingredients
For the Crust:
- ½ cup (1 stick) unsalted butter, melted
- ¼ cup granulated sugar
- 5 tablespoons unsweetened cocoa powder
- 1 large egg, beaten
- 1 teaspoon vanilla extract
- 1 ¾ cups graham cracker crumbs
- 1 cup shredded coconut (sweetened or unsweetened)
- ½ cup chopped walnuts or almonds (optional)
For the Custard Filling:
- ½ cup (1 stick) unsalted butter, softened
- 2 cups powdered sugar
- 2 tablespoons vanilla custard powder (Bird’s Custard Powder is the classic choice)
- 2 tablespoons milk
For the Chocolate Topping:
- 4 ounces semisweet or dark chocolate, chopped
- 2 tablespoons unsalted butter
Instructions
Step 1: Prepare the Crust
- Line an 8×8-inch baking pan with parchment paper, leaving an overhang on the sides for easy removal.
- In a medium saucepan over low heat, melt the butter. Stir in the granulated sugar and cocoa powder until well combined.
- Gradually add the beaten egg, stirring constantly to prevent curdling. Continue stirring until the mixture thickens slightly (about 1-2 minutes). Remove from heat.
- Stir in the vanilla extract, graham cracker crumbs, shredded coconut, and chopped nuts (if using). Mix until everything is evenly coated.
- Press the mixture firmly into the bottom of the prepared baking pan. Use the back of a spoon or a flat-bottomed glass to create an even layer.
- Place in the refrigerator to chill while preparing the filling.
Step 2: Make the Custard Filling
- In a mixing bowl, beat the softened butter until smooth and creamy.
- Add the powdered sugar and custard powder, mixing until combined.
- Pour in the milk and continue beating until light and fluffy (about 3-4 minutes). The mixture should be thick but spreadable.
- Spread the filling evenly over the chilled crust, smoothing it with a spatula.
- Return the pan to the refrigerator and chill for at least 30 minutes to firm up.
Step 3: Prepare the Chocolate Topping
- In a heatproof bowl, combine the chopped chocolate and butter.
- Melt over a double boiler or in the microwave using 20-second intervals, stirring between each, until smooth and glossy.
- Pour the melted chocolate over the chilled custard layer, spreading it evenly with a spatula.
- Let the chocolate set slightly at room temperature for about 10 minutes, then refrigerate until completely firm (at least 1 hour).
Step 4: Cutting and Serving
- Once the chocolate is set, use a sharp knife to slice the bars into squares or rectangles. For clean cuts, warm the knife with hot water and wipe it dry before slicing.
- Serve chilled and enjoy!
Tips for the Perfect Nanaimo Bars
- Use High-Quality Chocolate: Since the topping is a key component, use good-quality chocolate for the best flavor.
- Don’t Overheat the Chocolate: Melt it gently to prevent seizing.
- Chill Between Layers: This ensures clean layers and prevents the filling from mixing into the crust.
- Let the Chocolate Set Slightly Before Slicing: If the chocolate is too firm, it may crack when cutting.
Variations of Nanaimo Bars
While the classic Nanaimo bar is a favorite, there are many variations to try:
1. Peanut Butter Nanaimo Bars
- Substitute ¼ cup of the butter in the filling with creamy peanut butter.
- Use peanut butter chips instead of chocolate for the topping.
2. Mint Chocolate Nanaimo Bars
- Add ½ teaspoon peppermint extract to the custard filling.
- Use white chocolate for the topping and drizzle with dark chocolate.
3. Mocha Nanaimo Bars
- Dissolve 1 teaspoon of instant coffee in the milk before adding it to the filling.
- Use espresso-flavored chocolate for the topping.
4. Vegan Nanaimo Bars
- Replace butter with coconut oil or vegan butter.
- Use plant-based milk in the filling.
- Ensure the chocolate is dairy-free.
5. Gluten-Free Nanaimo Bars
- Use gluten-free graham crackers or almond flour for the crust.
How to Store Nanaimo Bars
- Refrigerator: Store in an airtight container for up to 1 week.
- Freezer: Nanaimo bars freeze well! Wrap individual squares in plastic wrap and store in an airtight container for up to 3 months. Thaw in the refrigerator before serving.
Pairing Suggestions
Nanaimo bars pair beautifully with beverages such as:
- Coffee: Their rich, sweet flavors contrast perfectly with a bold espresso.
- Tea: Enjoy with black or herbal tea for a lighter pairing.
- Milk: A classic pairing that balances the chocolatey richness.
Nanaimo bars are an easy yet decadent dessert perfect for any occasion. With their irresistible layers and simple, no-bake preparation, they’re a go-to treat for the holidays, potlucks, or just a sweet craving. Whether you stick to the classic recipe or experiment with different flavors, Nanaimo bars will always be a crowd-pleaser.
Try making a batch today and enjoy the taste of this iconic Canadian treat! 🍫🇨🇦
Creative Ways to Serve Nanaimo Bars
While Nanaimo bars are delicious on their own, you can get creative with how you serve them. Here are a few unique ideas:
1. Nanaimo Bar Sundae
Chop the bars into small chunks and sprinkle them over vanilla or chocolate ice cream. Drizzle with hot fudge or caramel sauce for an indulgent sundae.
2. Nanaimo Bar Cheesecake
Incorporate the flavors of Nanaimo bars into a cheesecake by using the crust recipe as the base, layering a custard-flavored cheesecake filling, and topping with a chocolate ganache.
3. Nanaimo Bar Milkshake
Blend a few pieces of Nanaimo bars with vanilla ice cream and milk to create a rich and creamy milkshake.
4. Nanaimo Bar Brownies
For an extra chocolatey treat, bake a batch of brownies and top them with a layer of Nanaimo bar custard filling and chocolate ganache.
5. Frozen Nanaimo Bar Bites
Cut the bars into bite-sized squares and store them in the freezer for a cool, refreshing treat during the summer months.
Making Nanaimo Bars for Special Occasions
Nanaimo bars can be customized for different events by adding decorations or using themed variations.
- Holidays: Add festive sprinkles to the chocolate topping or mix in peppermint extract for a Christmas twist.
- Birthday Parties: Drizzle with colored white chocolate or decorate with edible glitter for a fun and celebratory look.
- Weddings and Showers: Cut into elegant small squares and arrange on a dessert platter with other no-bake treats.
Nanaimo Bars Around the World
Though a distinctly Canadian treat, variations of Nanaimo bars can be found across different cultures. Some regions have adapted the dessert to suit local tastes:
- Australia: A similar treat called “hedgehog slice” features chocolate, biscuits, and coconut.
- United Kingdom: Custard tarts and caramel shortbread share similarities in texture and richness.
- United States: Variations of Nanaimo bars appear in bakeries, especially in the Pacific Northwest.
The universal appeal of Nanaimo bars lies in their rich layers and easy preparation, making them a dessert favorite worldwide.
Troubleshooting Common Nanaimo Bar Issues
If your Nanaimo bars don’t turn out quite as expected, here are some solutions:
1. Crust is Too Crumbly
- Ensure the mixture is well combined before pressing it into the pan.
- If too dry, add a little melted butter to help bind the ingredients.
2. Custard Layer is Too Soft
- Make sure to beat the custard filling for at least 3-4 minutes to achieve a thick and fluffy texture.
- Refrigerate the bars for an extended time before adding the chocolate layer.
3. Chocolate Topping is Cracking
- Allow the chocolate to cool slightly before spreading it over the custard layer.
- Score the chocolate lightly before it fully sets to prevent cracking when slicing.
4. Layers are Mixing Together
- Each layer should be chilled before adding the next. This ensures they stay distinct.
Fun Facts About Nanaimo Bars
- Official Dessert of Nanaimo: The bars are named after the city of Nanaimo, British Columbia, and are celebrated as an iconic Canadian treat.
- The Nanaimo Bar Trail: In Nanaimo, BC, there is an official “Nanaimo Bar Trail” where visitors can sample different variations of the dessert from local bakeries and cafes.
- Multiple Names: Some people call them “New York Slice” or “Canadian Layered Bars,” but Nanaimo Bars remain the most recognized name.
Final Thoughts
Nanaimo bars are a timeless and versatile treat that can be enjoyed year-round. Whether you stick to the traditional recipe or experiment with unique flavors, these bars are sure to be a hit. With no baking required, they are perfect for novice bakers and experienced chefs alike.
So, gather your ingredients, follow the steps, and enjoy the rich and creamy delight of homemade Nanaimo bars. Happy baking! 🍫🎂
